Doctor Who Party

Party SpreadAs you may have gathered from some of my previous posts, I am a huge Doctor Who fan. To welcome the new Doctor, I decided to throw a little party for myself and my Whovian friends.  We gathered at around 5pm, so that we’d have plenty of time to eat, chat and play games before the new episode came on.

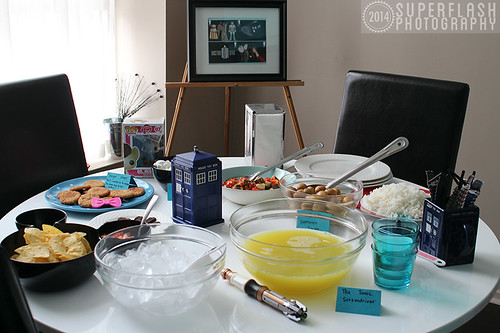
When I began to plan my party food, I was working with some dietary restrictions – I wanted all my food to be gluten-free and vegan friendly, so it wasn’t as easy as looking up a Doctor Who party on Pinterest and copying the recipes and ideas.  I had to come up with a little bit of creative thinking.

The Sonic Screwdriver
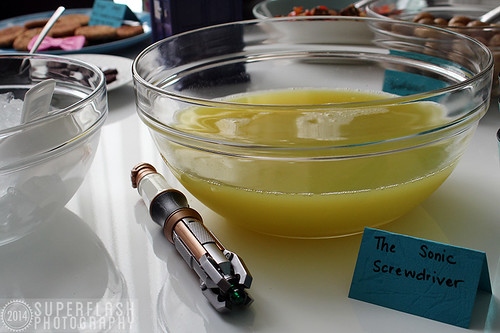
I started with a punch, that I fondly named “The Sonic Screwdriver,” served in turquoise blue Old Fashioned glasses, with a big bowl of ice on the side.  It consisted of 100% pure pineapple juice, some green Powerade (melon & pineapple flavour) for colour, and malibu rum.  It tasted like summer, and the entire bowl was gone by the end of the night.  As a special Whovian touch, we sipped out of Dalek straws, which were sitting in my TARDIS mug!  (AAHH! Daleks in the TARDIS?!)

As an appetizer/snack during the show, I prepared a bruschetta-style tomato mixture, as well as guacamole, served with gluten-free tortilla chips.  These were a big hit!  For the guac, I used this recipe, minus the cilantro (I’m not a fan!)

Sontaran Spuds & veggiesFor dinner, I served oven roasted potatoes (aka “Sontaran Spuds” – which was quite timely, since Strax was featured in the first episode of Series 8!), along with roasted vegetables and Jasmine rice.  I had originally intended on shaping the rice as an Adipose, but I ran out of time… so just imagine that it looks that way!  I couldn’t come up with a clever name for my veggies… anyone have any suggestions?

Dessert
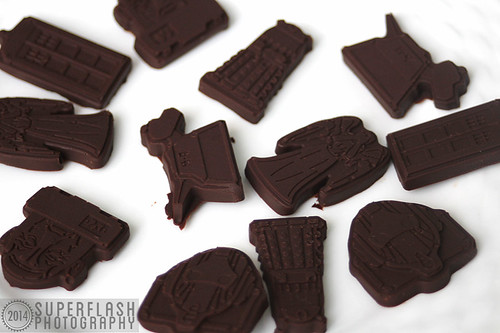
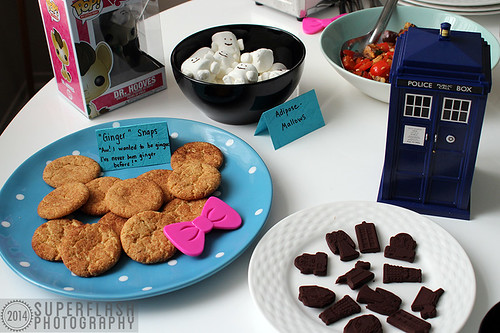
For dessert, I bought some Lucy’s cookies (I tried making some cookies, but I used a new recipe and it didn’t turn out – FAIL!).  So I set out some cookies with a cute little “ginger” quote – the Doctor always wants to be ginger! As well as some Adipose-Mallows (large marshmallows, with small marshmallows cut in half for legs and feet, and the face was painted on with chocolate).  I also used my Doctor Who chocolate moulds to create some festive little allergen-free chocolates in fun shapes!

Whovian Chocolate


Yahtzee in actionAfter dinner, I broke out my game of Doctor Who Yahtzee – which is basically like the original version, except the shaker is a TARDIS, and the dice have various Doctor Who characters on them.  It was pretty funny because none of us had actually played Yahtzee before… and the Sonic Screwdriver beverage was making math a bit difficult!  We had a blast though.  We managed to get in 6 rounds before it was time to sit down and watch “Deep Breath” (Series 8, Episode 1).

Did you do anything to celebrate the new Who?  What did you think of Peter Capaldi’s premiere episode?  Leave your thoughts in the comments… and check out more party pictures HERE.

May The Fourth Be With You

May The Fourth Be With You by Superflash Creative Happy Sunday, and May The Fourth Be With You!  Are you a Star Wars fan? Today’s the day for you to celebrate!  Are you doing anything special to mark Star Wars day?  Dressing up as your favourite character maybe?  Or just wishing this wonderful greeting to everyone you meet?

Here’s a little art piece I created in Photoshop.  I’m thinking of using Yoda as a full resolution printable – what’s your favourite Star Wars quote?

Share in the comments below, and let me know what you’re doing to mark Star Wars Day this year!

Last Minute Doctor Who Valentine – FREE!

Okay everyone – tomorrow is Valentine’s Day! Did you manage to get your hands on the coolest Valentine’s ever?  My printable Doctor Who Valentine’s are still available on Etsy, ** EDIT: now available HERE for 2016 ** but if you want something quick and free, or you want to supplement the Etsy 4-pack, I created one more matching card.

Doctor Who Valentine's Are Cool - freebie printable

You can find it at the Superflash Creative facebook page – all you have to do is “like” the page, and then click the “Free Downloads” tab.  You’ll be able to download the full resolution version of this printable card (with no website tag at the bottom), as well as all of the previously released freebies!

Happy Valentine’s Day!


Glitzy Glam Halloween Wreath

Glitzy Glam Halloween Wreath by Superflash Creative

For Halloween this year, I decided to create a wreath for our front door. But I didn’t want to do the traditional orange and black – instead I opted for something a little more glamorous. That’s how I came up with the Glitzy Glam Halloween Wreath. It was also important to me that I didn’t spend too much time or money on it – all of the products used to create the wreath were bought at either Dollar Tree or at Michael’s just last week when they had a sale on Halloween items (I also enjoy shopping the week after Halloween for great discounts on products for next year!). Time wise, it only took me about an hour or two to create the wreath.

The supplies I used were:
– aluminum wire, bent into circles
– thinner jewellery wire
– glue gun
– 4 silver & black skull garlands (Dollar Tree)
– 1 magenta & black bat garland (Dollar Tree)
– 1 wired silver skull garland (Dollar Tree)
– 1 black sparkly LED foam skull (Dollar Tree)
– 1 bunch of black roses with spiders (Dollar Tree)
– 28″ of black sparkly ribbon (Michael’s)
– 1 magenta floral spray (Michael’s)

Note: if you need a bigger view of the process shots, just click on the photo!

Glitzy Glam Halloween Wreath by Superflash Creative - Wire Frame  Step 1: Arrange aluminum wire into circle forms. Mine measured at 14″ diameter for the outside circle and 10.5″ diameter for the inside circle. Attach the two with wire “joints” – it doesn’t have to be too sturdy, since the garland will wrap around the forms. Just enough to keep them centered and spaced out while you work. Now, I used the aluminum circles because I happened to have the wire on hand – if you prefer, you can use a wreath form, pool noodle, or anything else that forms a circle!
Glitzy Glam Halloween Wreath by Superflash Creative - Wrapping Garland  Step 2: Once your circles are formed, you can begin wrapping your garland around the form.  I used about 1 length of garland per quarter of the wreath, for 4 garlands in total.  When I started, and came to the end, I used a drop of warm glue (I didn’t use the hot setting for fear of melting the plastic) to secure the garland to the wreath form.
Glitzy Glam Halloween Wreath by Superflash Creative - Garland  Step 3: After the black & silver skull garland was in place, I used one length of the black & magenta bat garland as an accent.  I wrapped it around loosely, just to give the wreath a bit of colour.
Glitzy Glam Halloween Wreath by Superflash Creative - wrapping wire garland  Step 4: To give the wreath a bit of dimension, I cut small (about 5-10″) lengths of the wired skull garland that I wanted to stick out from the wreath. To secure the wired garland, I simply moved aside a bit of the fluffy garland (in an area where it was not glued down) and wrapped the wire around the aluminum frame. Then once it was secure, I took the end that was sticking out of the wreath and twirled it around my finger to create a little curl.
Glitzy Glam Halloween Wreath by Superflash Creative - Ribbon  Step 5: At this point, the wreath should be taking a pretty good shape, and looking almost like the final product! This is a good time to cut your length of ribbon (I used about 28″ to hang it on my door from a screw – some people like to cut a super long ribbon and hang it from an upside down hook on the inside of the door – like this – but I prefer the inside of my door to be clean and free – either way, it’s your choice!)
Glitzy Glam Halloween Wreath by Superflash Creative - embellishments  Step 6: Now that you know where the top & centre of your wreath is, you can add your embellishments! I used a magenta floral spray that I got for 50 cents at Michael’s, one black rose at the bottom corner and a spider from the same arrangement at the top left of the wreath, and a foam sparkly skull with a control on the back to give it LED lit-up eyes).  I used low-temp glue from the glue gun to set them all in place.

And… voila! Here is the final product, hanging on my door & ready for trick-or-treaters! If you have any questions about any steps in the process, please leave them in the comments. And if you make a wreath like this one, please link it up! I’d love to see it!  (As always – all link party linkups are on the “connect” page!)
Glitzy Glam Halloween Wreath by Superflash Creative - Final Product!

Life’s A Beach – Photobooth!

Life's A Beach - Photobooth A photobooth can be such a wonderful addition to any party – and the good news is, it’s relatively easy to set one up!  For the Life’s A Beach birthday party, we picked a spot on a covered patio outdoor with nice lighting.  We nailed a large white sheet to the wall, and hung a fishing net, as well as the bunting for the party, available on Etsy.  Because the party was made up of 7-year-olds of varying heights, we also added a crate (covered by the white sheet) for the kids to step on – this allowed us to get some of the decor in the photobooth pictures.

Life's A Beach - PhotoboothThe best part about photobooths is that you get high quality photos from your party, where most will look directly into the camera – which is rare of party photos!  It is an interactive element to a party that all people, young and old, are happy to be a part of!  Add in a few props, and you can keep everyone entertained for hours!

If you have the capabilities, it’s fun to offer on-site printing – this allows for a take-home souvenir from a fabulous party.  It can also double as the “loot bag” for kids – and it’s a lot more memorable than candy or cheap toys.  It’s also fine to NOT offer prints from the party – you can email the photos or collect them all in an online photo album so that they can be shared afterwards.


Life's A Beach - Photobooth by Superflash Creative Life's A Beach - Photobooth by Superflash Creative

Life's A Beach - PhotoboothBecause I love you all so much, I’m offering up my photobooth props as a FREE DOWNLOAD.  You can click that link to download and print.   Cut them out, attach them to a small dowel rod, and you’re set! Add in a few other fun props (I found the Elvis glasses and luau garlands at the dollar store – and I made the chalkboard out of a dollar store tray, by painting it with chalkboard paint), and you’ve got yourself a rockin’ party that won’t soon be forgotten!  The props can be used for any party – they’re not “beach” themed at all.

If you use them, I’d love to see some photos! Post a comment and share them!

As always, blog link-ups can be found on the connect page.


craftionary

Life’s A Beach!

Life's A Beach, Superflash Creative, party, printables, pink, yellow, turquoise, etsy, bunting, For her 7th birthday, my niece requested a Beach Party theme, with bright pink, turquoise and yellow being the main colours.  Since I was planning a trip to Toronto that coincided with her birthday, I created the printables here in Florida, but also got to set up the party while I was visiting!  The Life’s A Beach party sprang into motion – you can pick up the printables for yourself over at the Superflash Creative Etsy Page.

The palate was super bright and colourful and it was really fun to come up with a design.  I chose the stripes to be somewhat reminiscent of a beach towel, and all the icons were of a beach theme, like sunglasses, flip flops, sandcastles, star fish and more.

Life's A Beach Party, photobooth, bunting, printables, Superflash Creative, beach, We only needed a short bunting for our party (you’ll see it in the photo booth!), but if you need a longer one, you can print out more pages and keep stringing!
Speaking of the photo booth – it was definitely the hit of the party! 7-year-olds really love starring in photos!

We set it up outside, on a screened in porch.  We nailed a plain white sheet to the wall, and then used an old fishing net and the bunting to decorate it.  We placed a sturdy crate on the floor and the sheet was long enough to cover it – this was ideal because some of the shorter girls were able to step up, and still have the bunting and fishing net in the background.  To the left, we set up a little Ikea table with a basket full of props.  (By the way – the moustache and giant dollar store elvis glasses were definitely the favourites at the party!)

Life's A Beach Party, Superflash Creative Life's A Beach Party, Superflash Creative Life's A Beach Party, Superflash Creative

Girls love their crafts!  For “entertainment” at the party, we came up with some beach-themed crafts.  It started with the paint a sea shell station, which was set up outside beside the photo booth.  The girls really loved this – some had never even seen a sea shell before! Some of the girls painted 4 or 5 shells themselves!

Life's A Beach Party, Superflash Creative Next, they moved on to the decorate a palm tree station – and it’s hard to say which craft they loved more!  We set out lots of tools for them to decorate with – from small pieces of paper that they could make a mosaic with, to glitter, sequins, gems, fancy scissors, markers, oil pastels and more!

After the girls ate, they moved onto the create a friendship bracelet station, to try and wind them down a bit.  Having craft stations set up is great, because it gives them something to take home (besides the loot bag) that they actually made themselves.  The girls really loved doing all these crafts!

Life's A Beach Party, cupcakes, Superflash Creative, Life's A Beach Party, cookies, palm tree, Superflash Creative Life's A Beach Party, cupcake, Happy Birthday Nicole, Superflash Creative

Life's A Beach Party, cake, beachy bears, teddy grahams, candy, gummies, Superflash Creative What’s a party without sweet treats?!  For Nicole’s Life’s A Beach party, we made a cupcake tower, with super cute, coordinating cupcake picks, and found a palm tree shaped platter to display my sisters famous chocolate chip cookies!

My favourite part though, was the cake I got to decorate for her!  I don’t normally consider myself to be a cake decorator, but I saw this idea floating around the internet, and I really wanted to try it for myself.  I used brown sugar for the sand, and two shades of turquoise icing for the water.  A few teddy grahams and some dolphin and shark gummies rounded out the cake.  This was a complete surprise for Nicole (I decorated it while the girls were painting shells outside!) and she was thrilled.  This is an easy enough design for anyone to make, and a great addition to any beach party!

That’s it from the beach for now! Check out some more photos over at the Superflash Creative Facebook Page and printables from the party at Etsy.  Look out for super cute photobooth pictures coming soon!

Life's A Beach Party, Superflash Creative, girls, teddy bear, beach cake, cute, 7 years old,

Masquerade Ball party

Sweet table closeup masked cupcakes A fun idea for a party theme is a masquerade ball. I threw this one just before Halloween in 2011, and it was a blast. I chose a colour scheme of red, black, silver, gold and white, and guests were asked to come in fancy clothes and a mask. The sweet table was set up in a corner and included a candy buffet, and various cakes and cupcakes (not yet pictured at left, as this was taken pre-party), all fitting within the colour scheme.  The space was further decorated with black candelabras & bleeding candles, red and gold helium-filled balloons, and table cloths in red and white.

Wine Bottle candles & book shelf In order to transform the space and carry the theme throughout the location, decor elements were added to every place a guest would cast their eyes. The main table was set up with a white table cloth and red runner. Candle holders were made out of wine bottles (with more bleeding candles) – and the bookcase behind was adorned with some feather boas, skulls and creepy cheesecloth, along with some extra masks we picked up at the dollar store for decorative purposes – and also for any guests who forgot to bring a mask.

Alcohol bottles Over by the bar, I took some bottles that we bought at the dollar store and made our own paper labels for them.  I filled each up with a different type of alcohol or mix (tonic water, vodka, cranberry juice and rum, I believe) – and these were set up on display, so that guests could either serve themselves or be served with other drinks behind the bar.

Some of my favourite men To set up a photobooth, I chose a section of wall with nothing else going on. I draped a white sheet over a curtain rod, and added some black cheesecloth over top.   A camera was set up on a tripod, a few feet away.  This could either be triggered by a remote, or by someone stepping behind the camera to frame the shot.  A photobooth is such a fun addition to a party, because people will act differently in front of a camera, and you will get some excellent photos and memories of your party!


I posed the question on Facebook the other day and would love to continue the discussion: In your opinion, what is the most important part of a party? Please feel free to answer here, or over on facebook!