Free Thanksgiving Printables!

Here in Canada, it’s Thanksgiving weekend!  I’d say Thanksgiving is probably my favourite holiday – not just because it’s my birthday weekend, but also because I think it’s awesome to have a day of the year that’s specifically dedicated to giving thanks.  This year in particular, I’m thankful for a lot of things – my family, first and foremost… my new job that I love, being in Canada… and so very much more!

So, I decided to create a printable for you and your families to share what you’re thankful for!

I'm Thankful For... free printables at Superflash Creative!


These printables are configured to print on an 8.5 x 11 sheet of paper – there are two files – one that says “I’m thankful for…” and one that is blank.  You can use the blank one as a place card, or a note, or … well whatever you like.

To get the printable, surf on over to the Superflash Creative Facebook Page – click like, and then click the “free downloads” button in the tool bar – you’ll see all the free printables I’ve offered over time, and if you click back at any time, you’ll be able to see all the new content that’s added as well!

Free Downloads @ Superflash Creative

Doctor Who Party

Party SpreadAs you may have gathered from some of my previous posts, I am a huge Doctor Who fan. To welcome the new Doctor, I decided to throw a little party for myself and my Whovian friends.  We gathered at around 5pm, so that we’d have plenty of time to eat, chat and play games before the new episode came on.

When I began to plan my party food, I was working with some dietary restrictions – I wanted all my food to be gluten-free and vegan friendly, so it wasn’t as easy as looking up a Doctor Who party on Pinterest and copying the recipes and ideas.  I had to come up with a little bit of creative thinking.

The Sonic ScrewdriverI started with a punch, that I fondly named “The Sonic Screwdriver,” served in turquoise blue Old Fashioned glasses, with a big bowl of ice on the side.  It consisted of 100% pure pineapple juice, some green Powerade (melon & pineapple flavour) for colour, and malibu rum.  It tasted like summer, and the entire bowl was gone by the end of the night.  As a special Whovian touch, we sipped out of Dalek straws, which were sitting in my TARDIS mug!  (AAHH! Daleks in the TARDIS?!)

As an appetizer/snack during the show, I prepared a bruschetta-style tomato mixture, as well as guacamole, served with gluten-free tortilla chips.  These were a big hit!  For the guac, I used this recipe, minus the cilantro (I’m not a fan!)

Sontaran Spuds & veggiesFor dinner, I served oven roasted potatoes (aka “Sontaran Spuds” – which was quite timely, since Strax was featured in the first episode of Series 8!), along with roasted vegetables and Jasmine rice.  I had originally intended on shaping the rice as an Adipose, but I ran out of time… so just imagine that it looks that way!  I couldn’t come up with a clever name for my veggies… anyone have any suggestions?

DessertFor dessert, I bought some Lucy’s cookies (I tried making some cookies, but I used a new recipe and it didn’t turn out – FAIL!).  So I set out some cookies with a cute little “ginger” quote – the Doctor always wants to be ginger! As well as some Adipose-Mallows (large marshmallows, with small marshmallows cut in half for legs and feet, and the face was painted on with chocolate).  I also used my Doctor Who chocolate moulds to create some festive little allergen-free chocolates in fun shapes!

Whovian Chocolate


Yahtzee in actionAfter dinner, I broke out my game of Doctor Who Yahtzee – which is basically like the original version, except the shaker is a TARDIS, and the dice have various Doctor Who characters on them.  It was pretty funny because none of us had actually played Yahtzee before… and the Sonic Screwdriver beverage was making math a bit difficult!  We had a blast though.  We managed to get in 6 rounds before it was time to sit down and watch “Deep Breath” (Series 8, Episode 1).

Did you do anything to celebrate the new Who?  What did you think of Peter Capaldi’s premiere episode?  Leave your thoughts in the comments… and check out more party pictures HERE.

May The Fourth Be With You

May The Fourth Be With You by Superflash Creative Happy Sunday, and May The Fourth Be With You!  Are you a Star Wars fan? Today’s the day for you to celebrate!  Are you doing anything special to mark Star Wars day?  Dressing up as your favourite character maybe?  Or just wishing this wonderful greeting to everyone you meet?

Here’s a little art piece I created in Photoshop.  I’m thinking of using Yoda as a full resolution printable – what’s your favourite Star Wars quote?

Share in the comments below, and let me know what you’re doing to mark Star Wars Day this year!

Free Printable: Chalkboard Easter Tags


It’s almost Easter and that has me thinking about Easter baskets!  Every good basket needs a tag, so I’ve created these printable chalkboard tags for you to download and share with all the little bunnies in your life! Simply download the high resolution PDF file, print, punch, tie and go!Free Printable Easter Tags from Superflash Creative


To download the PDF file, click HERE and hit “save as”.

Supplies needed:

  • printer
  • cardstock
  • scissors
  • ribbon or double-sided tape

Instructions:

1. For best results, print on heavy cardstock.  Print and carefully cut along the edges of each tag.

2. Use the tags by either punching through a corner and attaching with ribbon, or attaching to a treat bag with double-sided tape.  Use the tags to embellish Easter baskets, candy jars, treat bags or any other gift you’re giving this Easter – Enjoy!

Last Minute Doctor Who Valentine – FREE!

Okay everyone – tomorrow is Valentine’s Day! Did you manage to get your hands on the coolest Valentine’s ever?  My printable Doctor Who Valentine’s are still available on Etsy, ** EDIT: now available HERE for 2016 ** but if you want something quick and free, or you want to supplement the Etsy 4-pack, I created one more matching card.

Doctor Who Valentine's Are Cool - freebie printable

You can find it at the Superflash Creative facebook page – all you have to do is “like” the page, and then click the “Free Downloads” tab.  You’ll be able to download the full resolution version of this printable card (with no website tag at the bottom), as well as all of the previously released freebies!

Happy Valentine’s Day!


Doctor Who Valentine’s Cards

Okay, so I’m still completely obsessed with Doctor Who – the more I watch, the more I want to be the Doctor’s next companion.  But seeing as how that can’t happen, I’ll just design stuff to feed my obsession.  My latest output?  Doctor Who Valentine’s Day Cards, available now on Etsy Edit: This file is now available HERE for 2016

Doctor Who Valentine's Day Cards by Superflash Creative

I designed them as a one-page printout, with all four cards on one page.  They feature my two favourite aliens – The Dalek’s and the Adipose (both looking unbelievably cute – I think it’s the eyes!), as well as the TARDIS and the 11th Doctor’s Sonic Screwdriver.

For a quick Doctor Who freebie Valentine’s Day card, surf on over to the Superflash Creative facebook page, like the page, and click on the Free Downloads button 🙂

I dunno about you, but I’d be pretty stoked to receive one of these!  Anyone out there have suggestions for more themed Valentine’s Day cards? I still have a couple of weeks to get some done.  Leave notes in the comments!

Contest! Win a Holiday Card for yourself and a friend!

To celebrate 200 likes on Facebook, I’ve decided to host a giveaway!  Up for grabs are 2 custom designed holiday cards.  They can be for whatever holiday you want – Christmas, Hanukkah, Thanksgiving, New Years, Festivus, Kwanzaa, whatever you want!  You can tell me your preferred colour, style, if you want me to include a photo, you’re welcome to send it over.  Want a particular wording in a special font? I can do that too.  I will design something for you and one friend of your choosing.  You’ll get a low resolution that you can email to friends or add to facebook, as well as a high resolution version that you can submit to a site like VistaPrint so that you can print as many cards as you like!


Superflash Creative 200 Likes Contest! Win A Custom Designed Holiday Card for You and a Friend!


Interested?  Enter using Rafflecopter, below!

a Rafflecopter giveaway

Petting Zoo Party

Petting Zoo Party by Superflash Creative

Back in September, Jennie emailed me and asked if I would work on a party theme for her little guy, Caleb.  Caleb was going to have a farm-themed party, complete with a petting zoo in his own backyard!  I was super stoked to design the invitations, bunting, tented cards and more.  I thought about what best conveyed a “farm” / “animal”/ “country / “petting zoo” theme, as well as something suitable for a little boy.  I came up with red, navy blue and beige as the main colours.  I started by hand-drawing and scanning all the animals.  I drew a cow, sheep, chick, chicken, pig, and rabbit, and after I scanned them in, I coloured them digitally.

Petting Zoo Theme Invitation by Superflash Creative Jennie wanted to incorporate Caleb’s picture into the invitation, so I had her send me a photo, and then I drew some overalls and a hat.  I put them into photoshop and combined them all, and the result was a truly customized invitation that she wouldn’t be able to get anywhere else!  It’s little touches like this that really set invitations apart when your guests receive them in the mail!

There was a lot of information to deliver on a single flat card invitation, so with the top half of the card, I played with the colours and fonts to really convey what the party was all about.  Below the dots, I included all the information that Jennie needed her guests to know, including address, time, food and clothing options.

The “Yay or Neigh” text was Jennie’s idea, and I thought it was such an adorable touch!

A few of the farm animals were placed along the bottom of the invitation.  Between the animals and the bandana graphics on the invitation, party-goers would recognize a lot of the elements from the invitation carried throughout the party with various party printables.

Petting Zoo Theme Tented Cards by Superflash Creative
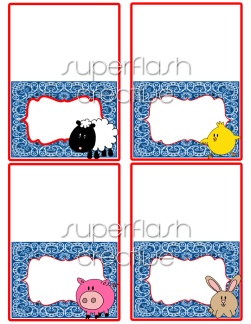
I created a set of tented cards to be placed on the food table.  The middle was left blank so that Jennie could write in the food options once they were decided.  She chose adorable names like “haystacks” for Rice Krispie Squares and “Chicken Feed” for Chex Mix.  It was super cute!

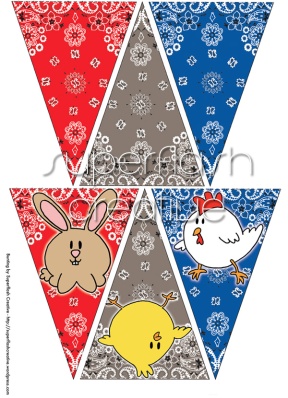
I actually created 5 pages of Bunting for Jennie – below is just an example of how it turned out.  I did one sheet of the plain bandana print in the 3 colours, a few pages with each animal taking centre stage, and I also spelled out “C-A-L-E-B” using the same font as his name in the invitation.  And of course, the Farmer Caleb picture made an appearance in the bunting too!

Some other elements that aren’t pictured here are a large “3” and “Happy Birthday” with the bandana print that Jennie used as decor and for the centrepieces.  I also included black and white versions of all the animals so that the kids could colour them.  Oh, and of course, there’s a thank you card… but you can’t see that until all of Caleb’s thank you’s get mailed out!

Petting Zoo Theme Bunting by Superflash Creative

I really wish I had been able to attend Caleb’s party. I was told it was a blast for both the kids and adults alike.  And naturally, Caleb thought it was the best party ever!

Photos at this party were taken by local photographer, Rachel Price – hopefully she will have some on her blog soon to share with you all.

Are you interested in hosting a farm party of your own?  Or would you like me to design custom printables for your party?  Float over to my connect page to get in touch with me!

(Linky Party links are also found on the connect page – check that out to see where I’ve partied this week!)

Glitzy Glam Halloween Wreath

Glitzy Glam Halloween Wreath by Superflash Creative

For Halloween this year, I decided to create a wreath for our front door. But I didn’t want to do the traditional orange and black – instead I opted for something a little more glamorous. That’s how I came up with the Glitzy Glam Halloween Wreath. It was also important to me that I didn’t spend too much time or money on it – all of the products used to create the wreath were bought at either Dollar Tree or at Michael’s just last week when they had a sale on Halloween items (I also enjoy shopping the week after Halloween for great discounts on products for next year!). Time wise, it only took me about an hour or two to create the wreath.

The supplies I used were:
– aluminum wire, bent into circles
– thinner jewellery wire
– glue gun
– 4 silver & black skull garlands (Dollar Tree)
– 1 magenta & black bat garland (Dollar Tree)
– 1 wired silver skull garland (Dollar Tree)
– 1 black sparkly LED foam skull (Dollar Tree)
– 1 bunch of black roses with spiders (Dollar Tree)
– 28″ of black sparkly ribbon (Michael’s)
– 1 magenta floral spray (Michael’s)

Note: if you need a bigger view of the process shots, just click on the photo!

Glitzy Glam Halloween Wreath by Superflash Creative - Wire Frame  Step 1: Arrange aluminum wire into circle forms. Mine measured at 14″ diameter for the outside circle and 10.5″ diameter for the inside circle. Attach the two with wire “joints” – it doesn’t have to be too sturdy, since the garland will wrap around the forms. Just enough to keep them centered and spaced out while you work. Now, I used the aluminum circles because I happened to have the wire on hand – if you prefer, you can use a wreath form, pool noodle, or anything else that forms a circle!
Glitzy Glam Halloween Wreath by Superflash Creative - Wrapping Garland  Step 2: Once your circles are formed, you can begin wrapping your garland around the form.  I used about 1 length of garland per quarter of the wreath, for 4 garlands in total.  When I started, and came to the end, I used a drop of warm glue (I didn’t use the hot setting for fear of melting the plastic) to secure the garland to the wreath form.
Glitzy Glam Halloween Wreath by Superflash Creative - Garland  Step 3: After the black & silver skull garland was in place, I used one length of the black & magenta bat garland as an accent.  I wrapped it around loosely, just to give the wreath a bit of colour.
Glitzy Glam Halloween Wreath by Superflash Creative - wrapping wire garland  Step 4: To give the wreath a bit of dimension, I cut small (about 5-10″) lengths of the wired skull garland that I wanted to stick out from the wreath. To secure the wired garland, I simply moved aside a bit of the fluffy garland (in an area where it was not glued down) and wrapped the wire around the aluminum frame. Then once it was secure, I took the end that was sticking out of the wreath and twirled it around my finger to create a little curl.
Glitzy Glam Halloween Wreath by Superflash Creative - Ribbon  Step 5: At this point, the wreath should be taking a pretty good shape, and looking almost like the final product! This is a good time to cut your length of ribbon (I used about 28″ to hang it on my door from a screw – some people like to cut a super long ribbon and hang it from an upside down hook on the inside of the door – like this – but I prefer the inside of my door to be clean and free – either way, it’s your choice!)
Glitzy Glam Halloween Wreath by Superflash Creative - embellishments  Step 6: Now that you know where the top & centre of your wreath is, you can add your embellishments! I used a magenta floral spray that I got for 50 cents at Michael’s, one black rose at the bottom corner and a spider from the same arrangement at the top left of the wreath, and a foam sparkly skull with a control on the back to give it LED lit-up eyes).  I used low-temp glue from the glue gun to set them all in place.

And… voila! Here is the final product, hanging on my door & ready for trick-or-treaters! If you have any questions about any steps in the process, please leave them in the comments. And if you make a wreath like this one, please link it up! I’d love to see it!  (As always – all link party linkups are on the “connect” page!)
Glitzy Glam Halloween Wreath by Superflash Creative - Final Product!

Craft Night Party!

Superflash Creative Craft Party To celebrate my new crafting space, I decided to throw a small crafting get together with some coworkers.  As it turned out, “small” turned out to be super small, and it was just myself and one other due to a few different unplanned circumstances… but sometimes those are the best kinds of parties!

Superflash Creative Craft Party - Fruit Infused Water When I started thinking about the party, I began thinking about my menu.  The party was planned to take place after work on a Friday night, and there were some dietary concerns to consider too.  I eat primal, and my coworkers are vegetarian and vegan.  There is a bit of overlap between the food needs – the best of which is that they are all focused on natural, healthy foods.  Since it was a craft party, I thought about colour, and I decided the best foods I could possibly serve were fruits and vegetables!  They’re colourful, and they’re primal, vegan, and vegetarian friendly – how could I go wrong?

So, my menu consisted of:

    • a platter of fresh berries & grapes, and some green apple slices.  I whipped up a vegetarian/primal friendly dip out of Greek yogurt, maple syrup, vanilla and cinnamon, and a caramel dip made of dates, vanilla, almond milk and water that is friendly to all three diets.

Superflash Creative Craft Party - Cucumber Tomato Salad

  • A fresh cucumber and tomato salad.  This has always been a summer staple in my Italian family, and it is delicious.  It’s just diced (fresh – not canned) tomatoes, cucumber, fresh basil,  onions and then a dressing made up of olive oil, salt, pepper and garlic powder.  Yum.
  • Not pictured, but I also popped some natural popcorn.  Popcorn is one of those things that isn’t really paleo-friendly, but I have to admit, I did cheat a little.  It’s hard to resist!
  • For beverages, we had a giant glass jar with fruit-infused water, and two glorious bottles of wine that my coworker, Cheryl, brought (no, we didn’t go through both!)

Of course, I added little labels beside each item so that everyone was able to identify what they wanted/were able to eat.

Superflash Creative Craft Party - Fruit & dips

Superflash Creative Craft Party  - Craft Room

Superflash Creative Craft Party - Bottle Cap Magnets

When it came to the crafting portion of the evening, I wanted to pick things that would be easy for everyone to create, but also things that would turn out nice and would be fun to display.  Bottle Cap magnets were the first thing that came to mind, because they’re quick, easy, fairly trendy right now, and they turn out great.

I happen to save bottle caps every time I drink anything from a glass bottle – and since the centrepieces at my wedding were made of glass coke bottles… I happened to have a lot of bottle caps!  We started by using one-inch circle punches to cut out our images.  I used an vintage magazine to cut out a cute little couple, and some old sheet music for mine.  Cheryl made hers out of a business card.  I added a bit of embellishment, with glitter, rhinestones and beads.  Then we used Mod Podge’s Dimensional Magic to seal them in place.
Superflash Creative Craft Party - crafts & wine

While we let our magnets dry a bit, we watched a bit of Orange Is The New Black and then began crafting up some cards.   Cheryl made a beautiful “I Love You” card for her man, while I created a little something to mail up to my nephew for his first birthday.  We decided to make use of some of my tools and toys, and picked out some stamps, ink, and embossing powder.   I’m not sure if you can tell in the pictures, but in my card, the word “one” is embossed in red, and in Cheryl’s, the butterfly is embossed with a lovely clear embossing powder, on top of turquoise ink.  Her card turned out really great!

Superflash Creative Craft Party - Card & Magnets Superflash Creative Craft Party - card

In the end, it turned out to be a super fun night of wine and art!  We both had a blast, and came away with a few fun things to display and share.  To recap, here are some of my tips for throwing a craft party:

  1. Take into consideration other people’s diets, and plan accordingly.  There is bound to be something for everyone, even if it takes a bit of creative planning.
  2. Lay some butcher paper over your surfaces.  It serves as scrap paper, if you want to test out a colour before using it on your project, and it makes for easy cleanup the next day!
  3. If you know how to use something that’s unique and interesting – teach others the technique too!

Superflash Creative Craft Party - Creating!

Have you ever thrown a craft party?  What are your best tips?